Alpe d'Huez said:
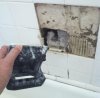
Anyone have any ideas on how to best fix this?
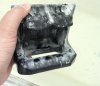
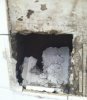
In case the pix don't tell the picture, the soap holder was sealed into the tile surrounding the shower. It came off when Mrs. Aple put her hand on it or something. It took three more tiles with it (which didn't break, which is good news). It left what you see.
Alpe, if the material behind the ceramic tiles is sheetrock, then repair is a piece of cake.
MATERIALS NEEDED:
a. fast set wood glue from local hardware store (I have used Liquid Nails) that sets in minutes (instead of hours).
b. scrap of sheetrock to match your sheetrock thickness
c. scrap of wood (e.g. from 1" x 4" stock)
d. wallboard joint compound (I use DAP brand)
e. 2" to 3" long screw (long enough to grip well when screwed into wood)
f. one or two sheetrock screws, depending on size of hole
f. drill
g. screwdriver
h. wallboard putty knife (fingers would work good for this job too)
i. saws for cutting wood & sheetrock
PROCEDURE:
1. cut out a piece of sheetrock a bit smaller than the hole, that leaves small gap you later fill in with wallboard joint compound.
2. cut a piece of wood from 1/2-inch to 1-inch stock (e.g. 1x4) that rectangular in shape and is:
....a) narrower than the hole (so it can fit through hole and be glued behind)
....b) is longer than the hole in the other dimension so it can overlap the edges of the hole by 2 to 4 inches. The part that overlaps each edge of the hole and faces the backside of the sheetrock will need to be smeared with glue later.
3. in the center of the rectangular wood from step #2, drill and screw a wood screw into it. Screw should be long enough to grip well with fingers when you fit the wood through the hole... so you do NOT drop the wood behind the wall.
4. test your sizing of woodstock... (no not that Woodstock)... make sure you can fit the wood through the hole while gripping the screw, and are able to hold it in place with the wood flat against the backside of the sheetrock with the desired overlap of wood across the edges of the hole. Resize wood and/or screw placement as necessary to provide quick easy placement (so glue don't dry before you can set the wood in place).
5. smear the overlapping sections of wood with a quick set glue
6. place wood through hole and glue that sucker to the backside of the sheetrock.
7. while gripping screw, hold the wood in place until the glue's cure is mostly complete. You will be able to let go of the screw and let the glue cure for the recommended cure time.
8. once cured, remove the screw.
9. place sheetrock cutout from step #1 into hole, and screw it onto the wood cutout using a sheetrock screw.
10. fill in the gaps around the edges of the sheetrock with wallboard joint compound.
11. joint compound will take several applications as it shrinks a bit while drying. Let it dry completely between applications.
For sealing, hopefully the soap dish is not a screw in type, but a glued in type like tiles for better sealing to prevent water penetrating.
12. Replace soap dish and tiles.
That should be a start. You may have to rethink the procedure a bit depending on what the situation really is, as I am only going by the pictures. But I can tell you I have repaired many small holes in the wall using the procedure above. And once it is covered up, no one will know.
(p.s. 9 rows up fr. the 25-yd line vs. Jags)


")


