I have used one before and I will say that it must have been ok because cold showers are right up there with getting my eyes gouged out. I don't know what the differential is for GFI at voltage above 110vac but I am not fuzzy wondering what happens when and if the thing shorts out..the idea of running electricity into the shower in the first world scares me..third world..electric run into the shower..? Gotta a reason not to many countries do this..?

The DIY thread
Page 18 - Get up to date with the latest news, scores & standings from the Cycling News Community.
You are using an out of date browser. It may not display this or other websites correctly.
You should upgrade or use an alternative browser.
You should upgrade or use an alternative browser.
- Feb 9, 2013
- 7,453
- 9,204
- 23,180
Yes, beggars can't be choosers, apparently these electric shower heads are very common in South America and the Philippines.I have used one before and I will say that it must have been ok because cold showers are right up there with getting my eyes gouged out. I don't know what the differential is for GFI at voltage above 110vac but I am not fuzzy wondering what happens when and if the thing shorts out..the idea of running electricity into the shower in the first world scares me..third world..electric run into the shower..? Gotta a reason not to many countries do this..?
If you have time to kill and are as fascinated by these things as much as I am here's a whole webpage and posts explaining them and people's experiences having used them.
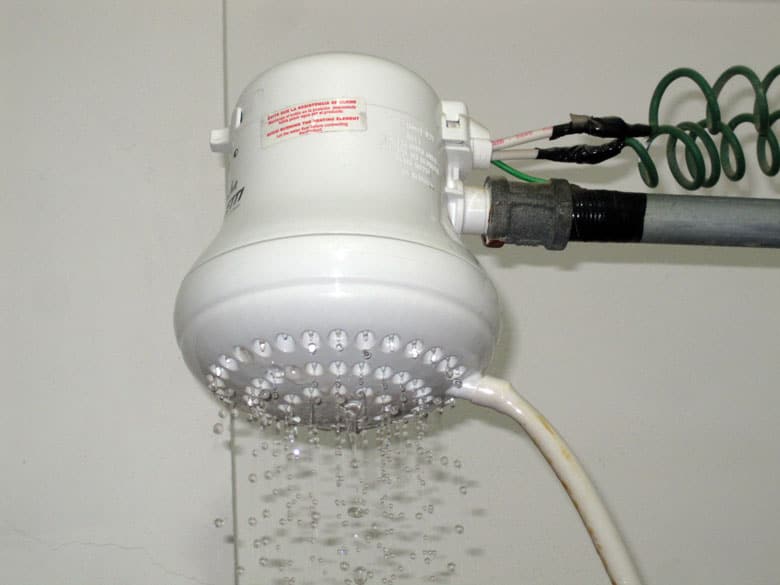
Electric Showers?! How Shocking! (Are They Really Suicide Showers?) | Storyteller Travel
When I stepped in the shower for the first time in Ecuador I was shocked to see wires coming out of the shower head! I could not believe what I was seeing! My
 gringosabroad.com
- Feb 9, 2013
- 7,453
- 9,204
- 23,180
This is more of an artsy-craftsy type of DIY...
So, my xmas tree topper is a bird, and unfortunately over the years he has kinda lost his arse. So naturally I had to fix this, thankfully we have a whole bunch of wild turkeys running around and they tend to lose their feathers. So I used their lost feathers, plus some spray paint and glitter, in order to fix up my bird. (Crikes, I'll be crapping glitter for the next decade, cause anyone who has ever worked with glitter knows it gets into everything and it's around to stay!)
Before:

After:

Isn't he beautious?
So, my xmas tree topper is a bird, and unfortunately over the years he has kinda lost his arse. So naturally I had to fix this, thankfully we have a whole bunch of wild turkeys running around and they tend to lose their feathers. So I used their lost feathers, plus some spray paint and glitter, in order to fix up my bird. (Crikes, I'll be crapping glitter for the next decade, cause anyone who has ever worked with glitter knows it gets into everything and it's around to stay!)
Before:
After:
Isn't he beautious?
Trike you are super duper brave..in our house glitter for a couple of days on anything gives us glimmer for the year..both cats have made it half way up the Christmas tree already..the one cat works low hanging ornaments like Mike Tyson working a speed bag!!
Our cats can look at things all day with zero interest..but when the clock strikes midnight..rubber bands,hair ties, matches hard candy..anything becomes of great fascination to bat around the floor..
Glittered anything is like cat crack..
Very cool tree topper..ours is a run of the mill,star..nothing custom
Merry Christmas..
- Feb 9, 2013
- 7,453
- 9,204
- 23,180
Merry Xmas to you and yours as well, and try to keep those kitties safe and off the tree, you hear!Trike you are super duper brave..in our house glitter for a couple of days on anything gives us glimmer for the year..both cats have made it half way up the Christmas tree already..the one cat works low hanging ornaments like Mike Tyson working a speed bag!!
Our cats can look at things all day with zero interest..but when the clock strikes midnight..rubber bands,hair ties, matches hard candy..anything becomes of great fascination to bat around the floor..
Glittered anything is like cat crack..
Very cool tree topper..ours is a run of the mill,star..nothing custom
Merry Christmas..
- Feb 9, 2013
- 7,453
- 9,204
- 23,180
Ok, this may not seem like much of a DIY to the expert DIYer, but being I'm not quite there yet today I had to learn how to use one of those handheld jigsaw thingies. My project was cutting some bigger pieces of wood I already had into kindling-sized wood for the woodstove (it's gotten pretty cold here recently and woodstoves are always a nice remedy), hilarity ensued!
I'm happy to report I didn't accidentally saw anyone's limbs off, I did break a few blades, though. No biggie, just had to make a trip to my beloved Home Depot for replacements.
Anyhoo, at first using the jigsaw frightened me, but with a little bit of practice (and reading the user's manual) it is possible to get a hang of it without hurting oneself.
When we bought this house 12 years ago, the previous owner had just installed a 20x20 pergola over the back patio. Great idea, but it was an ugly, white vinyl one. We have never liked it. but it provides a huge shade shadow. I decided to remove everything, but the four corner posts, and hang shade sails from them. There are five sections with 48 louvers each, and I wrongly assumed that if I took off one of the cross beams I could slide the louvers out and repeat that five times. Each louver has a tab on each end (one top, one bottom) which doesn't make sense really because with the cross beams in place the louvers can't go anywhere. On the first section I made 100+ cuts with a Dremel tool and cutting bit (about 2 hours) to get the louvers out. My hand/arm/shoulder/feet couldn't handle doing that again, while dangling 12 feet in the air. I bought a blade for my reciprocal saw which makes the tab cutting much easier (about 50 minutes of easier work per section), but it still required 60ish cuts because the person who installed it didn't keep all of the tabs in the same orientation so are were several wasted jabs per section. I also made a make-shift scaffolding so I wasn't teetering on the ladder.
Has anyone ever painted vinyl? I might be able to pull the vinyl cover off of the galvanized steel posts, but paint doesn't stick to galv-steel very well.
Has anyone ever painted vinyl? I might be able to pull the vinyl cover off of the galvanized steel posts, but paint doesn't stick to galv-steel very well.
- Feb 9, 2013
- 7,453
- 9,204
- 23,180
Not sure I've ever painted galvanized steel, and if I have I can assure you it was by pure accident.When we bought this house 12 years ago, the previous owner had just installed a 20x20 pergola over the back patio. Great idea, but it was an ugly, white vinyl one. We have never liked it. but it provides a huge shade shadow. I decided to remove everything, but the four corner posts, and hang shade sails from them. There are five sections with 48 louvers each, and I wrongly assumed that if I took off one of the cross beams I could slide the louvers out and repeat that five times. Each louver has a tab on each end (one top, one bottom) which doesn't make sense really because with the cross beams in place the louvers can't go anywhere. On the first section I made 100+ cuts with a Dremel tool and cutting bit (about 2 hours) to get the louvers out. My hand/arm/shoulder/feet couldn't handle doing that again, while dangling 12 feet in the air. I bought a blade for my reciprocal saw which makes the tab cutting much easier (about 50 minutes of easier work per section), but it still required 60ish cuts because the person who installed it didn't keep all of the tabs in the same orientation so are were several wasted jabs per section. I also made a make-shift scaffolding so I wasn't teetering on the ladder.
Has anyone ever painted vinyl? I might be able to pull the vinyl cover off of the galvanized steel posts, but paint doesn't stick to galv-steel very well.
Acrylic paints are supposed to stick, but apparently this will take a bit of prep work and lots of maintenance. (Doesn't that sound like the Golden Gate Bridge where re-painting the bridge is a non-stop job?)
Otherwise it sounds like you knew your way around your project, so good job!
EDIT - You may find this link useful, it talks about painting galvanized steel. https://www.indmetalstrap.com/paint...xt=The truth is that paint,it to peel or shed.
Last edited:
Yamaha has ugly turn signals but..they all worked fine..went down a bumpy dirt road..there is a small rubber transition piece that is the stem were the hard plastic lense bulb enclosure attaches..the rubber allows the turn signal to shake a little wo breaking. It broke..they wanted almost $60 bucks for one at the dealer..Amazon and other sites not much better.Main issue..the H7 headlamp bulbs are anywhere from $12-25 bucks..I swapped out from halogen to LED..light is brighter,white and better..and for the two LED bulbs,cheaper than Halogen. After I did it I felt silly for wwaiting so long.
W that same thing in mind,thought to retrofit all 4 turn signals from regular bulbs to LED..so far I have needed wiring harness adapters,a specific LED turn signal relay..because of bicycle racing duty I need flashing hazard lights,another adapter..and these teardrop shape adaptors to fill the Yamaha holes were the new unit sits..I am not done..waiting hoping Tuesday all the right stuff comes and it works as advertised..did I mention that 5 minutes and $60 bucks I could have been finished..
Is there really any small job?
- Feb 9, 2013
- 7,453
- 9,204
- 23,180
Hopefully the new parts will work out for you, keep me posted!Yamaha has ugly turn signals but..they all worked fine..went down a bumpy dirt road..there is a small rubber transition piece that is the stem were the hard plastic lense bulb enclosure attaches..the rubber allows the turn signal to shake a little wo breaking. It broke..they wanted almost $60 bucks for one at the dealer..Amazon and other sites not much better.Main issue..the H7 headlamp bulbs are anywhere from $12-25 bucks..I swapped out from halogen to LED..light is brighter,white and better..and for the two LED bulbs,cheaper than Halogen. After I did it I felt silly for wwaiting so long.
W that same thing in mind,thought to retrofit all 4 turn signals from regular bulbs to LED..so far I have needed wiring harness adapters,a specific LED turn signal relay..because of bicycle racing duty I need flashing hazard lights,another adapter..and these teardrop shape adaptors to fill the Yamaha holes were the new unit sits..I am not done..waiting hoping Tuesday all the right stuff comes and it works as advertised..did I mention that 5 minutes and $60 bucks I could have been finished..
Is there really any small job?
I recently had the immense pleasure of having to fix the shower faucet, naturally I did things slightly assbackwards in terms of turning off the water completely, but I was able to complete this latest DIY. Picture this...
The faucet was getting harder and harder to turn, and upon its very last turning the water just wouldn't turn off at all. Egads! Naturally this is not something I could put off because I can't afford a limitless water bill, so the faucet parts I removed and into the wall I went and turned off the hot and cold water supply screws individually. Even though I had no idea what I was doing this seemed to work, and thankfully I watched enough YT vids to guess it wasn't just a broken faucet handle, it was the actual cartridge behind it that needed replacing. (I had no idea single-handle faucets even had such cartridges till I watched some vids, you learn something new each time you embark on adventures in plumbing.)
Thankfully Home Depot had the specific replacement cartridge I needed available locally, so after some nervous installation (and actually reading the manual) I was able to replace it and the faucet works like new.
Whew! Glad I was able to DIY this myself, the cartridge alone was $39. Don't even want to know how much a plumber would have charged me for the labor!
UPDATE: Once I got all of the old pergola removed, I moved on to other projects while my wife decided how she wants to arrange the shades. She (I hope) has decided and I started fabricating the extenders/anchors for the posts (made out of metal from the removed parts). One of the bolts is 22" down inside of the post sleeve which is no problem until I insert the adaptor into the sleeve, and then my arm won't fit 22" down. No problem, just use a long ratchet handle, but I had visions of losing my ratchet and socket into a 9' deep sleeve: read: never be able to get it out. I tied a string around the ratchet head and then taped the socket to the ratchet.When we bought this house 12 years ago, the previous owner had just installed a 20x20 pergola over the back patio. Great idea, but it was an ugly, white vinyl one. We have never liked it. but it provides a huge shade shadow. I decided to remove everything, but the four corner posts, and hang shade sails from them. There are five sections with 48 louvers each, and I wrongly assumed that if I took off one of the cross beams I could slide the louvers out and repeat that five times. Each louver has a tab on each end (one top, one bottom) which doesn't make sense really because with the cross beams in place the louvers can't go anywhere. On the first section I made 100+ cuts with a Dremel tool and cutting bit (about 2 hours) to get the louvers out. My hand/arm/shoulder/feet couldn't handle doing that again, while dangling 12 feet in the air. I bought a blade for my reciprocal saw which makes the tab cutting much easier (about 50 minutes of easier work per section), but it still required 60ish cuts because the person who installed it didn't keep all of the tabs in the same orientation so are were several wasted jabs per section. I also made a make-shift scaffolding so I wasn't teetering on the ladder.
Has anyone ever painted vinyl? I might be able to pull the vinyl cover off of the galvanized steel posts, but paint doesn't stick to galv-steel very well.
One down, three to go! I was planning to get all four done today, but the first one took 4X longer than I planned, and now its 96 degrees. The other three will go faster because I have the system now.
- Feb 9, 2013
- 7,453
- 9,204
- 23,180
#1 - Always respect outdoor weather when you are DIYing outdoors! (Your wife will hopefully understand.)UPDATE: Once I got all of the old pergola removed, I moved on to other projects while my wife decided how she wants to arrange the shades. She (I hope) has decided and I started fabricating the extenders/anchors for the posts (made out of metal from the removed parts). One of the bolts is 22" down inside of the post sleeve which is no problem until I insert the adaptor into the sleeve, and then my arm won't fit 22" down. No problem, just use a long ratchet handle, but I had visions of losing my ratchet and socket into a 9' deep sleeve: read: never be able to get it out. I tied a string around the ratchet head and then taped the socket to the ratchet.
One down, three to go! I was planning to get all four done today, but the first one took 4X longer than I planned, and now its 96 degrees. The other three will go faster because I have the system now.
#2 - If you have found a way to DIY your project stick to it. It may not be the most usual way of doing things, but as long as it works - who cares?
Last edited:
- Feb 9, 2013
- 7,453
- 9,204
- 23,180
This DIY was without any doubt the worst I had ever tackled, had to change a bathroom faucet because the old one (at least 40 years old!) was leaky. On the packaging of the new faucet it said the installation should take about 30 minutes - my ass!
By the time I was finished watching how-to vids, finding the main water line, going to Home Depot, updating the old shut-off valves because they wouldn't work with the new faucet, and actually installing the faucet 6 hours had passed by easily. I'm not sure what was worse - finding out that the old fittings wouldn't work with a new product, having to squeeze myself into a very small space under the sink, getting drenched in gross water, or having to fix all the leaks after installation. Everything that could go wrong did...
About the only things I'm happy about are finding out the water main wasn't in the crawl space (the crawl space freaks me out!), having saved a decent amount of money, and using just about every tool I own. (At least I didn't have to run back to the store to buy new ones.) Some things I probably did slightly assbackwards, but for now the faucet works. I still have to change the elbow because it's leaky, but that's a project that can wait because the leak isn't serious and it's nothing that a bucket won't fix. For now I've had enough of adventures in plumbing.
- Feb 9, 2013
- 7,453
- 9,204
- 23,180
Sometimes DIYs go horribly wrong, this one is a disaster in gardening. Pictures this...
Two summers in a row now I've been trying to grow some potatoes - I've read all the instructions, it's supposed to be very easy. I planted some potato pieces, the subsequent plants looked very healthy and blossomed, and as expected they then died. So once the inevitable death occurred I was expecting to dig and find some nice-looking spuds, instead I got a handful of growths barely the size of a quarter. I don't know what I did wrong, the same thing happened last year.
Suffice to say this is most disheartening, it's and embarrassment to every potato grower and farmer out there!

I should just stick to plumbing, at least my project with the bathroom faucet mentioned upthread turned out well. No leaks or anything.
Two summers in a row now I've been trying to grow some potatoes - I've read all the instructions, it's supposed to be very easy. I planted some potato pieces, the subsequent plants looked very healthy and blossomed, and as expected they then died. So once the inevitable death occurred I was expecting to dig and find some nice-looking spuds, instead I got a handful of growths barely the size of a quarter. I don't know what I did wrong, the same thing happened last year.
Suffice to say this is most disheartening, it's and embarrassment to every potato grower and farmer out there!
I should just stick to plumbing, at least my project with the bathroom faucet mentioned upthread turned out well. No leaks or anything.
- Jul 29, 2021
- 1
- 1
- 15
Howdy DIY fellas, need your advice here
I plan to reorganize my garage and install a pool table.
I'd like to make a DIY one, huh. So, any advice is appreciated.
I looked up some ideas on Pinterest here
and read some "beginner" articles like this and this
still got many questions about the materials and sizes.
I've only played in bars, and I'm not a professional player. Neither a woodworker. Still, I'd like to at least try.
So, waiting for your feedback. Maybe someone had such an experience?
I appreciate your desire to build something with your own hands, but a pool table is something that I would buy off of craigslist or similar.Howdy DIY fellas, need your advice here
I plan to reorganize my garage and install a pool table.
I'd like to make a DIY one, huh. So, any advice is appreciated.
I looked up some ideas on Pinterest here
and read some "beginner" articles like this and this
still got many questions about the materials and sizes.
I've only played in bars, and I'm not a professional player. Neither a woodworker. Still, I'd like to at least try.
So, waiting for your feedback. Maybe someone had such an experience?
- Feb 9, 2013
- 7,453
- 9,204
- 23,180
Dear god, if I never have to face this crawlspace again...
Right, crap happened, fridge icemaker tube/line had to be replaced because the old plastic one was completely done for, so being the way this house had been designed I had to crawl through the dreaded crawlspace for the water source. None of it was fun, I can assure you. At one point I got very disoriented, but I did finally find my way out. So, on the next trip down I just set down some tea candle lights, I hope you all can appreciate the ambiance!


Right, crap happened, fridge icemaker tube/line had to be replaced because the old plastic one was completely done for, so being the way this house had been designed I had to crawl through the dreaded crawlspace for the water source. None of it was fun, I can assure you. At one point I got very disoriented, but I did finally find my way out. So, on the next trip down I just set down some tea candle lights, I hope you all can appreciate the ambiance!
Last edited:
The bottom picture is great!Dear god, if I never have to face this crawlspace again...
Right, crap happened, fridge icemaker tube/line had to be replaced because the old plastic one was completely done for, so being the way this house had been designed I had to crawl through the dreaded crawlspace for the water source. None of it was fun, I can assure you. At one point I got very disoriented, but I did finally find my way out. So, on the next trip down I just set down some tea candle lights, I hope you all can appreciate the ambiance!
I had to crawl under my moms house because a dresser was pushed (by my nosey, not helpful aunt) over her www cord, chopped off the end, and it fell through the floor at almost the farthest point from the access spot. More spiders, mouse poop, dead mice, and yuk than I had crawled through in a while. While I was under there I fixed a few other things, and sealed some things up. I wasn't in the mood for candles though...just tequila!
- Feb 9, 2013
- 7,453
- 9,204
- 23,180
When they say crawl space they really do mean for you to crawl through a dark, musty, rat poo-infested, claustrophobic nightmare that hopefully no longer contains asbestos, unfortunately I'll have to go back down there because there's a small leak in the copper pipe the icemaker tube is attached to. It's not really such a biggie now that I'm more familiar as to where the actual icemaker tube and leak are, but I'm still not looking forward to it.The bottom picture is great!
I had to crawl under my moms house because a dresser was pushed (by my nosey, not helpful aunt) over her www cord, chopped off the end, and it fell through the floor at almost the farthest point from the access spot. More spiders, mouse poop, dead mice, and yuk than I had crawled through in a while. While I was under there I fixed a few other things, and sealed some things up. I wasn't in the mood for candles though...just tequila!
Having said that last night's DIY (while watching the Avs/TB hockey game) was re-caulking the bathtub, it took me about the length of the game. So that was about 3 hours worth of scraping and cleaning and caulking, as a bonus I got to find out the difference between plain bathtub caulk and 100% silicone the hard way. I used the 100% silicone and thought it would be a breeze- what an ungodly mess that turned out to be!
Yes, 100% silicone is an F er to work with. I bought some stuff several years ago that is specifically for sink/tub surrounds (~50% silicone), and then used blue paint tape on either side of the caulk line. Caulk, tool, wait about 10 min., pull the tape, and lite finish tool. It was the best I have ever done with that job.When they say crawl space they really do mean for you to crawl through a dark, musty, rat poo-infested, claustrophobic nightmare that hopefully no longer contains asbestos, unfortunately I'll have to go back down there because there's a small leak in the copper pipe the icemaker tube is attached to. It's not really such a biggie now that I'm more familiar as to where the actual icemaker tube and leak are, but I'm still not looking forward to it.
Having said that last night's DIY (while watching the Avs/TB hockey game) was re-caulking the bathtub, it took me about the length of the game. So that was about 3 hours worth of scraping and cleaning and caulking, as a bonus I got to find out the difference between plain bathtub caulk and 100% silicone the hard way. I used the 100% silicone and thought it would be a breeze- what an ungodly mess that turned out to be!
For old caulk removal, rotary and oscillating tools work well with the correct bits.
Last edited:
- Feb 9, 2013
- 7,453
- 9,204
- 23,180
Most excellent tip on your part by mentioning masking tape when working with silicone fillers... I used masking tape last night when caulking with that godforsaken 100% silicone. As with painting you may get an occasional blob of caulk where it was not intended because the masking tape hadn't been put on right, but if you work fast enough it can always be removed. So, yay for masking tape!Yes, 100% silicone is an F er to work with. I bought some stuff several years ago that is specifically for sink/tub surrounds (~50% silicone), and then used blue paint tape on either side of the calk line. Calk, tool, wait about 10 min., pull the tape, and lite finish tool. It was the best I have ever done with that job.
For old caulk removal, rotary and oscillating tools work well with the correct bits.
Btw., I somewhat recall you had a DIY project a while back that involved some sort of galvanized steel posts that needed some painting , are you still working on that?
No, those post ended up not having any of the steel showing, but I'm trying options for painting vinyl now.Most excellent tip on your part by mentioning masking tape when working with silicone fillers... I used masking tape last night when caulking with that godforsaken 100% silicone. As with painting you may get an occasional blob of caulk where it was not intended because the masking tape hadn't been put on right, but if you work fast enough it can always be removed. So, yay for masking tape!
Btw., I somewhat recall you had a DIY project a while back that involved some sort of galvanized steel posts that needed some painting , are you still working on that?
- Feb 9, 2013
- 7,453
- 9,204
- 23,180
Vinyl posts you mean?No, those post ended up not having any of the steel showing, but I'm trying options for painting vinyl now.
TRENDING THREADS
-
 Liège - Bastogne - Liège 2026, one-day monument, 26th April
- Started by Krzysztof_O
- Replies: 2K
-
 Tour de Romandie neither one-day nor monument, 28/04-03/05 2026
- Started by QueenStagiaire
- Replies: 244
-
 Paris-Roubaix 2026, one day monument, April 12
- Started by Lequack
- Replies: 2K
-
 Itzulia Basque Country 2026, April 6-11
- Started by Dazed and Confused
- Replies: 2K
-
 Ronde van Vlaanderen 2026, monument, April 5 (men's)
- Started by Krzysztof_O
- Replies: 1K
-
 Teams & Riders The Remco Evenepoel is the next Eddy Merckx thread
- Started by DNP-Old
- Replies: 40K
-
 Teams & Riders Tadej Pogačar discussion thread
- Started by Lequack
- Replies: 44K
Cyclingnews is part of Future plc, an international media group and leading digital publisher. Visit our corporate site.
© Future Publishing Limited Quay House, The Ambury, Bath BA1 1UA. All rights reserved. England and Wales company registration number 2008885.